

Jeep Overland Lighting Setup Guide: From A-Pillar Lights to Trail Visibility
Jeep overland driving does not end when the sun goes down. In many real trips, the most difficult moments happen after dark: entering a campsite, following a narrow forest road, turning around on a rocky trail, checking a side slope, or recovering another vehicle at night. Factory headlights can handle paved-road visibility, but they are not designed to show every obstacle around an off-road vehicle.
A practical Jeep overland lighting setup should help the driver understand the whole trail environment, not just the road directly ahead. A-pillar lights can cover the side-forward zone. Bumper lights can help with near-front obstacles. Roof lights can extend long-distance visibility in open terrain. The best setup is not the one with the most lights, but the one that places each light where it solves a real problem.
This guide explains how to plan a Jeep overland lighting setup, from A-pillar lights and ditch lights to auxiliary spotlights, beam color, mounting position, wire routing, and trail visibility.
Why Factory Headlights Are Not Enough for Trail Driving
Factory headlights are built for normal roads. They project forward, follow road-use beam patterns, and help the driver see lanes, signs, and traffic. Off-road driving requires a different type of visibility. The vehicle may be turning sharply, climbing uneven terrain, moving beside brush, or approaching an obstacle from an angle.
On a trail, the driver needs to see more than the centerline ahead. The front corners, side ditches, tree branches, rocks, ruts, and campsite edges all matter. When a Jeep turns into a narrow trail entrance, factory headlights may point away from the area the tires are about to enter. This is why auxiliary lights are useful. They add lighting zones that the original headlights do not cover well.
For overland driving, light control is just as important as brightness. A poorly aimed light can reflect off the hood, blind the driver, or create unnecessary glare. A good setup should improve confidence without making the vehicle harder to control at night.
Understanding Different Jeep Auxiliary Lighting Positions
Each auxiliary light position has a different purpose. A roof light is not a replacement for an A-pillar light. A bumper light is not the same as a ditch light. Before buying more lights, it is better to decide what visibility zone the Jeep actually needs.
| Lighting Position | Best Visibility Zone | Best Use Case |
|---|---|---|
| A-pillar lights | Side-forward trail edges | Ditches, turns, forest trails, campsite access |
| Bumper lights | Near-front obstacles | Rock crawling, recovery work, front trail lighting |
| Roof lights | Long-distance forward visibility | Open desert roads, wide trails, long-range viewing |
| Low fog area | Low and wide ground lighting | Dust, rain, fog, and low-speed driving |
Why A-Pillar Lights Are Popular for Jeep Builds
A-pillar lights are popular because they fill one of the most common visibility gaps on a Jeep. When mounted near the windshield pillar and aimed slightly outward, they help illuminate the side-forward area of the trail. This is why they are often called ditch lights.
For overland use, this position is practical because it helps during slow and technical movement. When the driver turns into a trail, approaches a campsite, checks the side of the vehicle, or follows a narrow route, A-pillar lights give extra information near the front corners. They do not need to overpower the headlights. Their value comes from angle and placement.
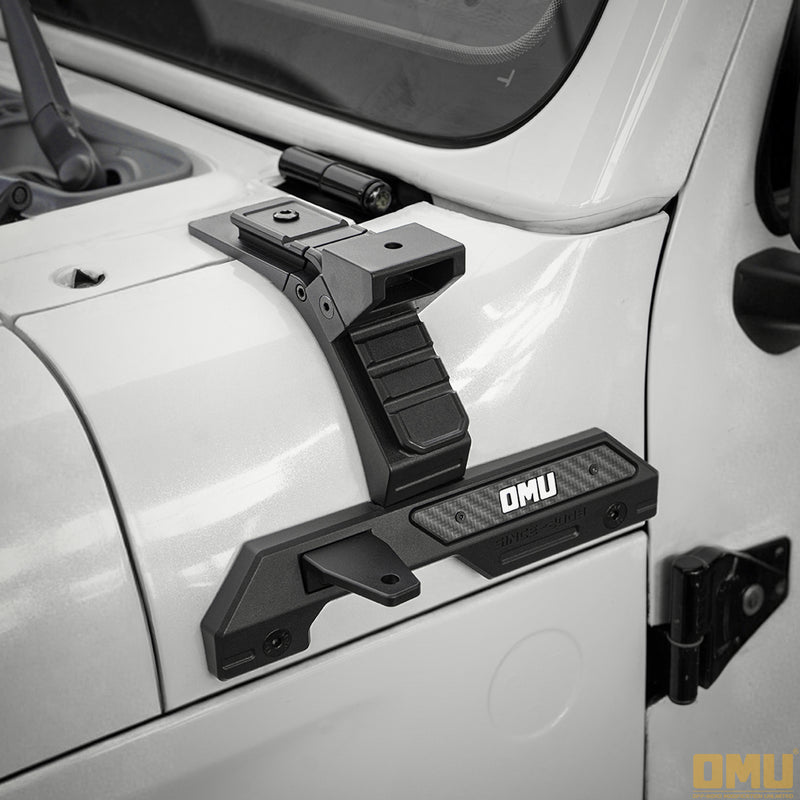
A stable mount is important. If the bracket vibrates, the light beam can shake and become distracting. A dedicated A-pillar dual light mount gives the lighting system a cleaner position and makes it easier to create a purposeful front-end setup.
FEATURED LIGHT MOUNT
Choosing the Right Auxiliary Spotlight
Once the mounting position is clear, the next step is choosing the light. For A-pillar use, a compact spotlight is often easier to manage than an oversized lamp. The area around the windshield, hood, mirror, and door is limited, so the light should fit cleanly without blocking visibility or interfering with body movement.
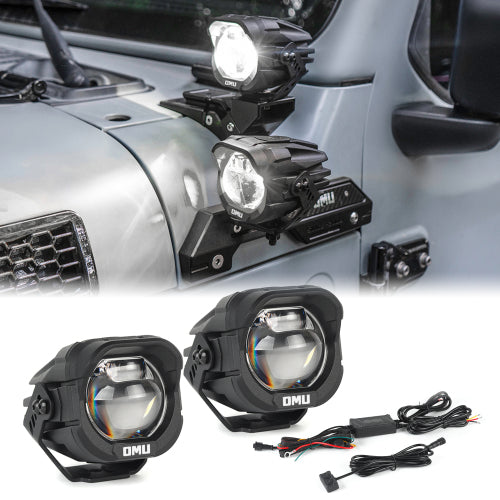
A 3-inch A-pillar spotlight is a useful size for many Jeep overland builds. It is compact enough for the pillar area while still providing practical auxiliary lighting. It can be paired with a dedicated mount and aimed slightly outward for trail-edge visibility. For a mixed-use Jeep, this creates a cleaner setup than adding large lights in every possible position.
The wire harness also matters. A light is only useful if it is wired cleanly and operates reliably. Proper routing helps keep cables away from heat, sharp edges, and moving parts. It also makes the final build look more intentional.
FEATURED SPOTLIGHT
Choosing Between White and Yellow Off-Road Lights
Beam color should match the terrain and driving conditions. White light gives a clean and bright view of the trail, making it useful for dry roads, rocks, open terrain, and general nighttime driving. Yellow light can be easier to use in dust, rain, fog, and low-contrast conditions because it creates a softer visual effect.
Many Jeep owners choose white for all-purpose visibility and yellow for harsh-weather or desert-style conditions. The right choice depends on where the vehicle is driven most often. However, aiming is still more important than color. A well-aimed yellow or white light will be more useful than a poorly aimed high-output lamp.
| Light Color | Best For | Typical Use |
|---|---|---|
| White | Clear detail and general brightness | Dry trails, rocky terrain, normal night driving |
| Yellow | Reduced harsh reflection and softer contrast | Dust, fog, rain, desert routes, campsite use |
Aiming and Installation Details That Matter
Good lighting performance depends on final adjustment. A-pillar lights should usually be aimed slightly outward, not directly forward. This gives the driver better side-forward visibility and reduces overlap with factory headlights. Bumper lights can be aimed lower and forward for obstacle visibility. Roof lights should be used carefully because they can create hood glare if aimed too low.
After installation, testing should be done at night. Daytime alignment only confirms that the lights look straight. Night testing confirms whether they actually help the driver see. The beam should show the trail edge, not the hood. It should reveal obstacles without reflecting harshly into the windshield.
- Confirm bracket clearance around the hood, windshield, mirror, and wiper area.
- Route wiring away from heat, sharp edges, and moving parts.
- Aim A-pillar lights slightly outward for ditch and trail-edge visibility.
- Test the beam at night before trail use.
- Recheck mounting hardware after rough-road driving.
- Use auxiliary lights responsibly around other vehicles and public roads.
Creating a Complete Jeep Overland Lighting System
A complete Jeep lighting system does not need to be complicated. For many overland builds, a practical setup begins with factory headlights, adds A-pillar lights for side-forward visibility, then uses bumper or roof lighting only when the terrain requires it. This keeps the vehicle functional without creating unnecessary weight, wiring, or visual clutter.
A-pillar lights and compact spotlights are especially useful because they solve a visibility problem that many Jeep owners notice immediately at night. When mounted correctly, they make narrow trails, campsite entrances, side slopes, and low-speed turns easier to read. When paired with a stable dual light mount and clean wire harness, they become one of the most practical lighting upgrades for a Jeep overland build.
Explore Jeep auxiliary lighting options for your overland build →
Frequently Asked Questions
What are Jeep A-pillar lights used for?
Jeep A-pillar lights are used to improve side-forward visibility. They help illuminate trail edges, ditches, turns, campsite entrances, and obstacles near the front corners of the vehicle.
Are ditch lights better than roof lights?
They serve different purposes. Ditch lights are better for side-forward trail visibility, while roof lights are better for long-distance illumination in open terrain.
How many auxiliary lights does a Jeep need?
Most Jeep builds do not need too many lights. A practical setup starts with the most important visibility gap, often A-pillar lights, then adds bumper or roof lights only if the driving conditions require them.
Should Jeep auxiliary lights be white or yellow?
White light is useful for general clarity and dry trails. Yellow light can be useful in dust, fog, rain, and softer terrain conditions. The best choice depends on where the Jeep is driven most often.
Why is a wire harness important for off-road lights?
A wire harness helps create a cleaner and more reliable installation. It supports proper routing, switching, and power connection while reducing loose or exposed wiring.
How should A-pillar lights be aimed?
A-pillar lights are usually most useful when aimed slightly outward. This helps illuminate side-forward terrain, trail edges, and ditch areas instead of duplicating the factory headlight beam.