

3'' A-Pillar Spotlight: A Compact Lighting Upgrade for Off-Road Builds
The OMU Genesis 3'' A-Pillar Spotlight is not the kind of accessory that changes an off-road build by size alone. Its value comes from where it can be used. A compact spotlight mounted near the A-pillar gives the driver a side-forward lighting angle that factory headlights, bumper lights, and roof lights may not provide in the same way.
For Jeep, Gladiator, Bronco, and other off-road platforms, this type of spotlight is especially useful when the vehicle is used at night on trails, campsites, rural roads, desert routes, or low-speed technical terrain. It helps the driver read the terrain near the front corners, check trail edges, and see areas that are easy to miss with forward-facing headlights only.
This product-focused guide explains how the OMU Genesis 3'' A-Pillar Spotlight works as a compact auxiliary lighting upgrade, what the wire harness adds, where the spotlight fits best, and how buyers can decide whether this type of light belongs in their off-road setup.
FEATURED PRODUCT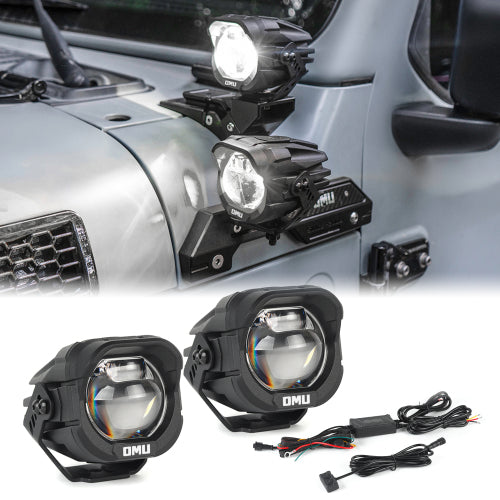
What Makes a Compact A-Pillar Spotlight Practical?
A compact spotlight works well on the A-pillar because the mounting area is limited. The light needs to sit near the windshield and hood without interfering with visibility, mirror position, wiper movement, or hood opening. A large lamp may create an aggressive look, but it can also appear oversized and become harder to aim correctly.
The 3-inch size makes the spotlight easier to integrate into a clean auxiliary lighting setup. It can pair with a dedicated A-pillar bracket, sit close to the vehicle body line, and provide useful light without dominating the front profile. For builds that aim for a balanced overland or trail-ready appearance, compact size is often an advantage.
This is especially true when two lights are used on a dual A-pillar mount. The bracket and lamps should look like a system, not a stack of mismatched parts. A compact spotlight helps keep the setup visually controlled while still adding real night-driving function.
Where This Spotlight Works Best
The OMU Genesis 3'' A-Pillar Spotlight is most useful in situations where the driver needs light near the side-front area of the vehicle. These are usually the areas factory headlights do not cover well: the trail shoulder, ditch line, side brush, campsite road, or terrain near the front tire path.
In forest driving, it helps show branches, rocks, and edge drop-offs. In desert driving, it can help reveal uneven texture and side terrain. Around campsites, it can make low-speed maneuvering easier. During recovery work, it can support visibility near the front corners of the vehicle without relying only on handheld lights or bumper-mounted lamps.
For a daily-driven Jeep or mixed-use off-road vehicle, this matters because the spotlight does not need to be used only during extreme conditions. It can help on rural roads, dark driveways, trail entrances, boat ramps, ranch roads, and night camping routes. The small size makes it easier to live with, while the A-pillar position gives it a practical lighting role.
Why the Included Wire Harness Matters
A wire harness may not look exciting, but it affects how reliable the lighting setup feels after installation. Auxiliary lights need proper routing, secure connections, and a practical switch path. Without clean wiring, even a good spotlight can become frustrating. Cables may hang loosely, pass near heat, rub against body edges, or create maintenance problems later.
The wire harness helps make the installation more complete. It gives the buyer a clearer path from lamp to power and switch control. For installers, this helps reduce improvisation. For vehicle owners, it makes the product feel more like a lighting solution rather than a loose lamp that still needs major supporting parts.
Good wiring also improves the final appearance of the build. A clean spotlight installation should not leave exposed cable loops around the hood or windshield area. The harness should be routed with the same attention as the bracket and light angle, because wiring is part of the final result.
White and Yellow Light Applications
A-pillar spotlights are often selected not only by size but also by light output style. White light is common for general trail clarity. It gives a bright, clean view and works well in many dry conditions. Yellow light can be useful when the driver faces dust, rain, fog, or low-contrast terrain. It can also create a distinct off-road visual style.
The choice should be based on real driving conditions. A driver who mostly uses the vehicle on dry rocky trails may prefer white. A driver who often faces dust, rain, or softer terrain may prefer yellow. The most important point is to test the light angle after installation because color cannot compensate for poor aiming.
| Light Choice | Best Use | Buyer Consideration |
|---|---|---|
| White spotlight | General night visibility and clear trail detail | Best for dry routes and all-purpose lighting |
| Yellow spotlight | Dust, rain, fog, and softer visual contrast | Useful for harsh weather or style-focused builds |
Pairing the Spotlight with an A-Pillar Mount
The spotlight becomes more effective when paired with a stable A-pillar light mount. The bracket controls placement, angle, and vibration. If the bracket is weak or poorly aligned, the beam may shake or drift. This reduces the benefit of the spotlight, especially on rough roads.
A dual A-pillar light mount can support a more complete lighting setup for selected Jeep applications. When used with compact 3-inch spotlights, the result can look clean while still adding useful visibility. The mount should allow enough clearance around the hood and windshield, and the light should be able to aim slightly outward.
This pairing is especially important for owners who want the lighting system to look intentional. A spotlight alone can appear like an add-on if the bracket does not match the vehicle. A proper mount helps the lamp sit at the correct height and angle, creating a more refined front-end upgrade.
RELATED MOUNTING OPTION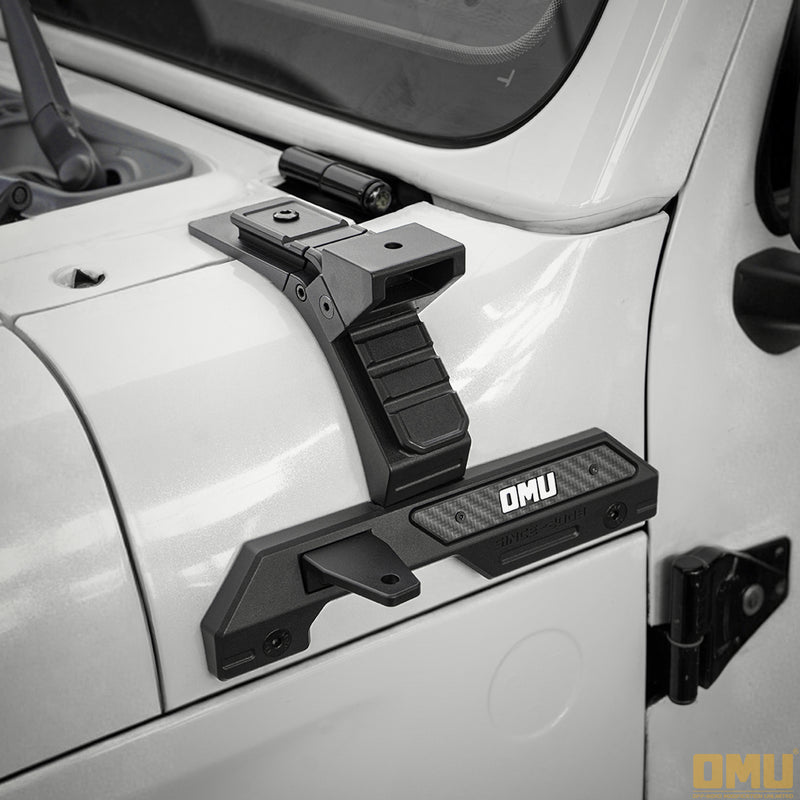
Installation Notes for a Cleaner Result
Before installation, confirm that the spotlight housing, bracket, and wiring path all work together. The light should not hit the hood, block the driver’s view, or interfere with nearby body components. The wiring should be routed in a protected path and secured so it does not move during vibration.
After installation, the beam should be tested at night. Many lights are installed during the day and never properly aimed until the driver is already on the trail. That creates frustration. A few minutes of nighttime adjustment can make the difference between glare and useful visibility.
- Check the selected mounting position before tightening the light.
- Confirm that the housing clears the hood, windshield, and mirror area.
- Route the wire harness neatly and protect it from sharp edges.
- Aim the spotlight slightly outward for side-forward coverage.
- Test both white and yellow options according to driving needs.
- Recheck bracket and light hardware after rough-road use.
Common Mistakes When Adding Compact Spotlights
One common mistake is choosing a light only by brightness. A bright lamp with poor placement can still create glare or leave the trail edge invisible. Another mistake is using an unstable bracket. If the light moves during vibration, the beam becomes distracting instead of helpful.
Some buyers also forget about wiring until the end of the installation. This can lead to rushed cable routing, exposed wires, or awkward switch placement. The cleanest setups treat the spotlight, bracket, and wiring harness as one system from the beginning.
A final mistake is not testing the light after dark. Daytime alignment only confirms that the lamp looks straight. Night testing confirms whether the beam actually helps the driver.
Who Should Choose This Spotlight?
This spotlight is best for off-road drivers who need practical auxiliary lighting without adding a bulky roof bar or oversized lamp housing. It suits Jeep builds, trail vehicles, campsite vehicles, overland setups, and other off-road platforms where compact lighting and clean installation matter.
It is especially useful for drivers who travel after dark, enter remote campsites, drive through forest roads, or want better visibility near the vehicle’s front corners. It may not replace a long-range roof light for high-speed open terrain, but it provides a useful lighting zone that many vehicles lack.
A Small Spotlight Can Change the Night-Driving Experience
The OMU Genesis 3'' A-Pillar Spotlight is a compact accessory, but its effect depends on how it is mounted and aimed. When paired with the right bracket and wire harness, it can improve side-forward visibility, make low-speed trail movement easier, and give the vehicle a more complete auxiliary lighting setup.
For off-road builds, the best lighting upgrade is not always the biggest one. Sometimes the most useful light is the one placed exactly where the driver needs more information. That is the practical value of a compact A-pillar spotlight.
View the OMU Genesis 3'' A-Pillar Spotlight With Wire Harness →
Frequently Asked Questions
What is the OMU Genesis 3'' A-Pillar Spotlight designed for?
It is designed as a compact auxiliary spotlight for A-pillar and off-road lighting setups, helping improve side-forward visibility during night driving, trail use, and campsite access.
Does the spotlight include a wire harness?
Yes. The product is positioned as a spotlight with wire harness, which helps support a cleaner and more complete auxiliary light installation.
Can this spotlight be used on different off-road vehicles?
Yes. It is positioned as a universal model, but buyers should still confirm bracket compatibility, mounting clearance, wiring path, and installation requirements for their vehicle.
Is this spotlight better for A-pillar or roof mounting?
It is especially practical for A-pillar mounting because its compact size suits side-forward lighting. Roof mounting may work in some setups, but roof lights usually serve a different long-range purpose.
What bracket should be used with this spotlight?
A stable A-pillar light mount is recommended. The bracket should provide correct clearance, strong support, and enough adjustment to aim the spotlight slightly outward.
What should be checked after installing the spotlight?
Check light angle, bracket tightness, wire routing, hood clearance, and vibration after the first drive. Nighttime beam adjustment is also recommended before trail use.